
Pothos is the easiest houseplant to propagate, period. A 4-inch stem cutting tossed in a jar of tap water roots in about two weeks. Within a year, a single starter pothos can become 10, 20, or even 50 new plants for free. This is the propagation method beginners learn on, and it works almost every time.
Botanical reference: the plant discussed in this guide is Epipremnum aureum (also known as Devil’s Ivy, Golden Pothos), in the family Araceae.
This guide covers the three reliable methods for pothos propagation, with timelines, success rates, and the small details that separate successful propagators from frustrated ones.
Quick Answer: How to Propagate Pothos
Pothos propagates most reliably in water (95% success, roots in 1-3 weeks), in soil (80% success, roots in 3-5 weeks), or by air layering (95% success but slower setup). Take a 4-6 inch stem cutting just below a node, remove the bottom leaf, and place the bare node in water or soil. Keep in bright indirect light. Transplant water cuttings to soil once roots are 2-3 inches long. Variegated cultivars retain their patterns through propagation, unlike snake plants.
Before You Start: Three Things to Know
1. Variegation transfers cleanly through cuttings
Unlike snake plants (where leaf cuttings revert to solid green), pothos cuttings preserve variegation reliably. A Marble Queen cutting becomes a Marble Queen plant. A Manjula cutting becomes a Manjula. The exception: cuttings from sections that are mostly all-green will produce all-green plants, even from a variegated mother. Choose cuttings with clear variegation visible.
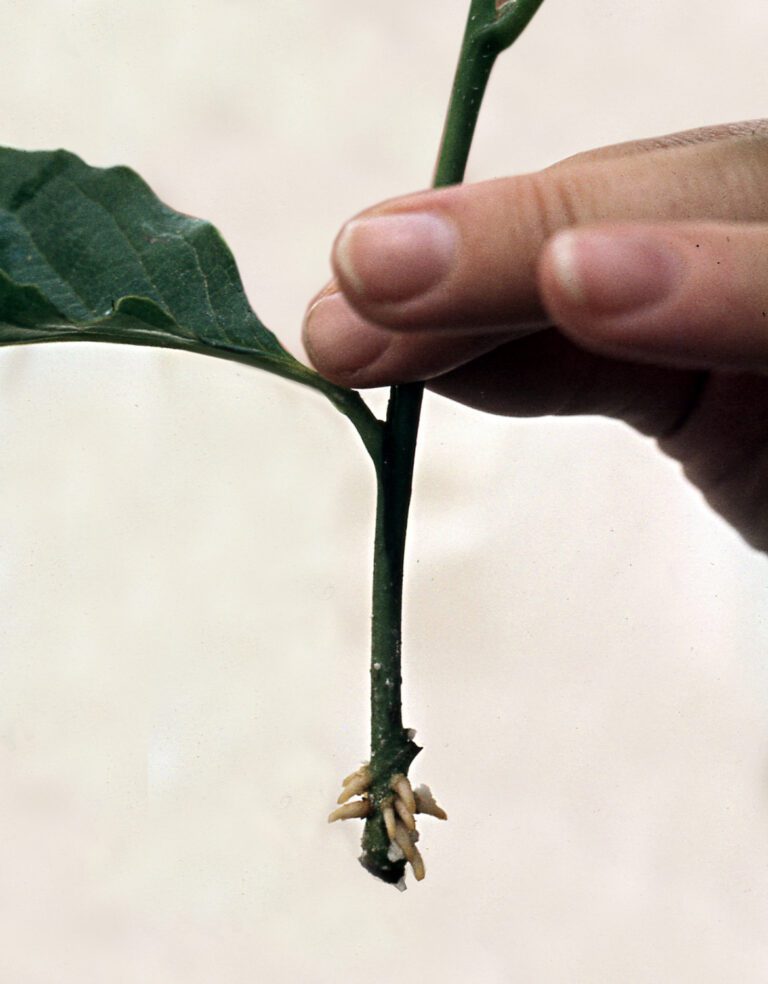
2. Cuttings need at least one node
The node is the bump on the stem where a leaf attaches. New roots grow from nodes, not from leaves or random stem sections. Every cutting must include at least one node. Two or three nodes per cutting is even better.
3. Spring and summer give the fastest results
Pothos roots fastest during active growing season (March to August). Winter propagation works but takes 2-3x longer. If possible, time propagation projects for warm months.
Method 1: Water Propagation (Easiest, Most Popular)
The classic method. Easy to set up, satisfying to watch, and reliable for beginners. The trade-off: water-rooted cuttings face a transition shock when moved to soil that water cuttings face but soil cuttings do not.
What you need
- Healthy mature pothos with stems 6+ inches long
- Sharp, sterilized scissors or pruning shears
- Glass jars or vases
- Room-temperature water (filtered or sat-out tap water is best)
Step-by-step
Step 1. Identify a healthy stem with at least 2-3 leaves and 1-2 nodes. Cut the stem 1/4 inch below a node using clean scissors. Cuts that include a node will root; cuts above a node will not.
Step 2. Remove the lowest leaf so that the bottom node is bare. This is the part that will sit in water and develop roots.
Step 3. Place the cutting in a glass of room-temperature water with at least one node submerged. Multiple cuttings can share one jar if it is wide enough.
Step 4. Position the jar somewhere with bright indirect light. Avoid direct sun (heats water and stresses cuttings) and avoid full shade (slows rooting).
Step 5. Change the water weekly to prevent stagnation and bacterial buildup. If the water turns cloudy, change immediately.
Step 6. Wait. Roots typically appear in 1-3 weeks. Once roots are 2-3 inches long with multiple branching root tips, transplant carefully into well-draining potting mix.
Timeline and success rate
Visible roots: 1-3 weeks. Transplant-ready roots: 3-5 weeks. New leaf growth after transplanting: 4-6 weeks. Success rate: 95%+ for healthy cuttings in good conditions.
Method 2: Soil Propagation (Skips Transition Shock)
Direct soil propagation skips the transition stress of moving from water to soil, but you cannot watch root development. The plant goes “underground” for a few weeks until new growth indicates rooting.
What you need
- Healthy stem cuttings (same specs as water method)
- Small pots with drainage holes (3-4 inch nursery pots work fine)
- Standard indoor potting mix with extra perlite (or pre-mixed houseplant soil)
- Optional: rooting hormone powder
Step-by-step
Step 1. Take 4-6 inch cuttings just below a node. Remove the lowest leaf to expose the node.
Step 2. Optional: dip the bare node in rooting hormone powder. Pothos roots fine without it, but rooting hormone speeds the process by 1-2 weeks.
Step 3. Plant the cutting in moist potting soil with the node 1 inch deep. Multiple cuttings can share one pot if you space them 1-2 inches apart.
Step 4. Water lightly to settle the soil around the cutting. Then keep soil barely moist (not wet) for the first 4-6 weeks. Overwatering rots cuttings before they root.
Step 5. Place in bright indirect light. Cover with a clear plastic bag or dome for the first 2-3 weeks to maintain humidity around the cuttings (this dramatically improves success rates).
Step 6. Wait. After 3-5 weeks, gently tug a cutting; resistance indicates roots have formed. Once new leaves appear (typically week 4-8), the cutting is fully established.
Timeline and success rate
Roots: 3-5 weeks. New leaf growth: 4-8 weeks. Success rate: 80-90% with humidity dome, 60-70% without.
Method 3: Air Layering (For Long Vines)
Air layering creates a new pothos plant while it is still attached to the mother plant. Roots develop on the parent vine before you separate the cutting, eliminating transition stress entirely. Best for established pothos with long, mature vines.
What you need
- Mature pothos with vines 12+ inches long
- Sphagnum moss (dampened)
- Plastic wrap or aluminum foil
- Twist ties or string
Step-by-step
Step 1. Identify a healthy node midway down a long vine. Make a small notch (not all the way through) in the stem just below the node.
Step 2. Wrap dampened sphagnum moss around the wounded node and the surrounding 2-3 inches of stem.
Step 3. Wrap the moss with plastic wrap, securing both ends with twist ties. The moss should be enclosed but allow a small opening for moisture monitoring.
Step 4. Keep the moss damp by adding water through the opening every few days. Do not let it dry out.
Step 5. Wait 4-8 weeks. Roots should be visible inside the plastic wrap once they form.
Step 6. Once roots are 2-3 inches long, cut the vine just below the rooted section. Plant the new rooted section in soil immediately.
Timeline and success rate
Roots visible: 4-8 weeks. Ready to separate: 6-10 weeks. Success rate: 95%+ because the cutting stays nourished by the mother plant during rooting.
Pothos Propagation Comparison Table
| Method | Time to Roots | Time to New Plant | Success Rate | Best For |
|---|---|---|---|---|
| Water | 1-3 weeks | 4-6 weeks | 95% | Beginners, visible progress |
| Soil (with humidity) | 3-5 weeks | 4-8 weeks | 80-90% | Patient propagators, no transition shock |
| Air layering | 4-8 weeks | 6-10 weeks | 95%+ | Long mature vines, established collectors |
Common Pothos Propagation Mistakes
Mistake 1: No node in the cutting
Cuttings without a node will never root. Identify the node bumps on the stem and ensure each cutting has at least one. Roots only emerge from nodes.
Mistake 2: Submerging too many leaves
Leaves underwater rot quickly and contaminate the water. Strip the bottom leaves so only the bare node sits in water. The remaining leaves stay above the waterline.
Mistake 3: Not changing water
Stagnant water grows bacteria that rot cuttings instead of helping them root. Change water weekly minimum.
Mistake 4: Overwatering soil cuttings
Soil cuttings need barely-moist conditions until roots establish. Wet soil rots them. Use a humidity dome to maintain moisture without saturating the soil.
Mistake 5: Direct sun on cuttings
Direct sun heats water (causing root rot) and stresses leaves of unrooted cuttings. Keep all propagation in bright indirect light, never direct sun.
Mistake 6: Disturbing cuttings during rooting
Pulling cuttings out to “check on roots” damages developing root systems. For water cuttings, you can see roots through the glass. For soil cuttings, wait the full timeline before checking.
Mistake 7: Cuttings from all-green sections of variegated plants
Variegated pothos cuttings retain their pattern only if the cutting itself has visible variegation. Cuttings from all-green sections produce all-green plants. Choose visibly variegated cuttings.
FAQ
Can I keep pothos in water permanently?
Yes. A pothos cutting in water with weekly water changes and a drop of liquid fertilizer monthly will live for years. Many people keep pothos in glass vases as permanent kitchen counter or bathroom decoration. Growth is slower than in soil and the plant stays smaller, but it is a valid permanent setup.
Why are my pothos cuttings not rooting?
Most common reasons: cutting did not include a node, water never changed, cutting placed in too much shade or direct sun, or cutting taken from a stressed mother plant. Try again with healthier cuttings, fresh water, and bright indirect light.
How many cuttings can I take from one pothos?
A mature pothos with several long vines can yield 10-20 cuttings without harm. Aggressive pruning often stimulates the mother plant to grow back fuller and bushier. Snake plant propagation is much slower; pothos is the opposite.
Can I propagate pothos in winter?
Yes, but slower. Winter propagation takes 2-3 times longer due to slower plant metabolism. Use a heat mat (around 70-75°F) to speed things up. Spring and summer remain the easiest seasons.
Do I need rooting hormone for pothos?
No. Pothos roots reliably in plain water without any rooting hormone. If you have rooting hormone for soil cuttings, it speeds the process by 1-2 weeks. For water cuttings, it serves no purpose.
Are pothos cuttings safe around pets?
Pothos sap and leaves contain calcium oxalate crystals that are toxic to cats and dogs (the ASPCA’s pothos toxicity entry covers symptoms and severity). Keep propagation jars and cuttings out of reach during the rooting process. Wash hands after handling.
What to Do After Roots Form
Once your pothos cuttings have established roots (2-3 inches for water-rooted, visible new growth for soil-rooted), they enter the early plant stage. Care during this transition matters:
- Repot carefully. Water-rooted cuttings transition best when potted in slightly moist (not wet) soil. Place 3-5 cuttings together in a 4-inch pot to create a fuller plant from the start.
- Maintain humidity for the first 2 weeks. Cover with a clear plastic bag (with a few small holes for airflow) to ease the water-to-soil transition. Remove the bag gradually over 7-10 days.
- Bright indirect light only. Never direct sun while cuttings are establishing.
- Water sparingly. New cuttings need much less water than mature plants. Let the top of the soil dry between waterings.
- First fertilizer at 6 weeks. Resume normal pothos care after 6-8 weeks once new growth confirms establishment. Use balanced liquid fertilizer at half strength.
By month 3, the new pothos plant should look indistinguishable from a nursery-bought specimen. By month 6, it produces vines and is ready for its first significant pruning.
Pothos Propagation Is the Best Houseplant Hobby
Once you have successfully propagated one pothos, you have unlocked an unlimited supply of new plants for free. Many pothos collectors maintain a “propagation jar” permanently on a kitchen counter, replacing finished cuttings with new ones as they go. Friends, family, and plant trading communities welcome free pothos plants.
For the broader pothos care system, see our complete pothos care guide. For specific cultivars worth propagating, the pothos varieties guide covers the options. For watering newly potted cuttings, the pothos watering schedule guide applies once cuttings are established.
The plant does most of the work. You just provide the jar.
Related reading: For the broader context, see the complete guide to hard-to-kill houseplants, all plant care guides, complete watering guide.